
How to make easy bone broth with a whole chicken
It is actually really simple and you really can’t mess it up. AND the benefits are so good for you! All you need is…
- Crock-pot
- Leftover chicken ( This can be a rotisserie chicken, Chicken pieces, a whole chicken Etc. Anything goes. It has seasoning on it….AWESOME! More flavor)
- Water
- Veggies ( A few celery stalks, an onion, a few carrots)
Place your leftover chicken and veggies in your crock-pot. Fill up the rest of your crock-pot with water and turn on low. Cook for 10-14 hours. BAM! You have your very own homemade chicken broth. I love this so much because there really is no messing it up. No veggies? Don’t add any. Wanna little extra flavor? Throw in some seasonings. Don’t have a crockpot? No biggie. Put it in a large pan on the stove.
What are the benefits of homemade bone broth?
There are so many reasons that making bone broth at home is beneficial but for Today I am just going to name a few.
Gut Health:
There is so much talk nowadays about gut health. What is it? and Why does it matter? Well, I am not a doctor so I am just going to explain it plain and simple. Basically, all diseases start in our gut. Therefore it would make sense that we keep our gut healthy. Bone Broth can literately heal the lining of your gut. For myself, this is an important factor. I have always dealt with a terrible digestive system and need to do all I can to help it to heal. I don’t like or really believe in a lot of medication. So when I find things I can do myself I jump on it. I love when I can make things that will naturally build my immune system!
Saving Money:
So we know that we need bone broth to help heal our guts. But It can get expensive when you have to buy it. I mean if you want a good brand you are looking at spending a good chunk of change. I love that I can make my own bone broth and “recycle” my leftover chicken. Most likely you were just throwing away your leftover chicken carcass Now you are making something that is hugely beneficial for your body. How cool is that?
Quality:
Like I mentioned getting a good quality bone broth you have to spend quite a bit of money. And you still don’t know exactly how it was made. I am a firm believer in making and growing things myself. Then I am 100% sure how it was made and what all went into it. But I don’t have a ton of time. So when I find things like this that don’t take a lot of extra time I do it! Also, When you buy it at the store you are not guaranteed that they actually used bones to make it. Sometimes that just make it from meat. Which is not the same. The health benefits come from the collagen in the bones of the animal. I always assumed chicken broth and chicken stock are the same…But are they?
Are bone broth and bone stock the same thing?
As I was looking into it I noticed that when people talked about a bone stock that meant it was made from the bones of the chicken and when they said bone broth that was made from just the meat. Well, that’s tricky! I would have never known that when buying it. Not saying that there are no benefits from broth made from just meat but there are not near as many! BUT as I look online it seems like not everyone makes a distention between the two. That being said I would get stock just in case. If you are buying it. But it seems to me that nobody really knows that so everyone just refers to it as chicken broth. SO confusing! But if you make it yourself it does not matter what it is called, right?
What to do with it?
Now that you have all this broth what do you do with it? Obviously get it into your body. But you can only drink so much broth or make so much soup before it goes bad, right? I mean you will have an entire crockpot full of broth when you are done. So what I do it pressure can it. Now don’t run away. I know a lot of people are scared of pressure canners. But don’t worry! It is easy and I will walk you through the whole process. And let me tell you it is SO nice having that chicken broth ready at any time. I used to freeze everything. But that is such a pain to have to think ahead and thaw things out. Now I can it and it is ready whenever I need it.
Canning Your homemade bone broth…
At this point, you will have your broth and chunks of meat still in your pan. Strain out the big pieces into a large pan and bring to a boil. While you are waiting Clean and sterilize your jars. I personally run them through the dishwasher on a quick hot rinse cycle. Don’t worry about adding soap. You are just trying to sanitize them. I place my lids in a bowl of boiling water to make sure they are clean and sanitized. Once your bone broth is at a boil, pour it into your clean jars. Leaving 1-inch headspace. Now wipe the rim of your jars. You can either do this with a paper towel or the lazy way with your finger like I do. You are just doing this to make sure nothing is on the lid that will stop it from securing to the jar. Now attach your clean lids to the jars…
…..Now the scary part! The pressure canner!
Okay, just so you feel comfortable please read the directions that came with your pressure canner! I have done this a lot and still read them every time just to make sure I do it right. And every canner is a bit different. I personally use a presto brand caner.
So as the directions will tell you to look over your machine and make sure everything is in order. Once you do this place your pressure canner on a larger burner. Add 3 quarts of water ( At this point I also add 2 tablespoons of white vinegar to the water. This helps the outside of the jars to not turn white and cloudy.) and turn on high. Secure the lid on your pressure canner.
Now you wait until steam comes out of the pressure valve. ( Again, this is how my model works. Make sure to read the directions on your model in case it differs.)
Once you see steam let it come out for 10 minutes. After that place the cover over the valve. (The cover is the little metal piece that is black on the top.
Now, wait until it reaches 10 pounds pressure. Once this happens you start the timer. 20 minutes for pints, 25 minutes for quarts. Watch it and make sure you are keeping the temperature around 10 pounds. You may need to turn the heat down. When the timer goes off turn the heat off. And Move the caner off the hot burner. Pick it up so that you do not scratch your stove top! At this point leave it alone and let it cool down! DO NOT TAKE THE TOP OFF! Once the little safety button goes down you can remove the pressure valve. Once the steam is gone you are safe to open it!
The finished product!
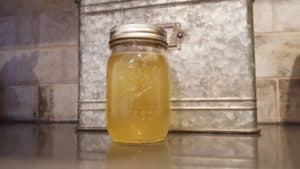
WOOHOO! You did it! now you have awesome gut healing immune boosting homemade broth! Ready to go for sickness and everyday use! I have actually taken this a step farther and raised my own chickens and butchered them! So I make broth from my own chickens! But that is a post for another time and another day! I actually try to make broth every time I make a chicken as I hate letting any of that gut healing goodness go to waste! BUT if you don’t have the time to make broth every time you make a chicken check out the tip below…
Extra tips
This method is for using up a chicken that you just has dinner the night before (or a few days before ;). But I know that we don’t all have the time to can chicken broth every time we make a chicken…
….So feel free to freeze your chicken carcasses as you eat them and then when you have a few make your broth at that point. If you want to make a bunch just make a batch in your crock-pot and make some in pans on the stove at the same time. You do it the same way as the crock-pot but just put it on low on the stove.
You can also freeze veggies that are on the brink of going bad or the skins of the onion too!
Again, don’t be overwhelmed there is no right or wrong way. And the timing does not make a huge difference. If you forget about it and it was on the stove or in the crock-pot for more than 14 hours…
…again No big deal! Don’t stress about getting every detail perfect!
Your chicken broth (or should I say stock?) will turn out awesome and will be filled with lots of awesome immune building minerals.
And I just have to say I am proud of you for using a pressure canner! I know so many people that are scared to use them! But they are missing out. This past year I started pressure canning and I LOVE it! I now pressure can EVERYTHING! I might be a little bit addicted. But it is so easy and I love having my own food canned and ready to go!
Happy Homesteading!
~Courtney